
When you strip them down to their fundamental building blocks, businesses operate in a series of processes. There’s a process for client onboarding, for product development, for shipping and handling, and so on. If you can get a clear understanding of these processes and how they interact with one another, you can streamline your business operations, making them more efficient and less prone to error. This is where process mapping comes in.
Process mapping is the practice of diagramming business processes in a visual way. By creating a process map, you can see how different tasks and activities are connected, identify bottlenecks and areas for improvement, and make better-informed decisions about how to optimize your operations.
In this article, we’ll introduce you to the basics of process mapping, and we’ll give you six tips for creating effective process maps.
Let’s get started!
Why use process mapping?
If you were embarking on a hike, road trip, or journey of any kind, would you endeavor to do so without a map? Probably not. The same goes for business operations. If you want to make your way from Point A to Point B, you need a plan — and that’s where process mapping takes the wheel.
Process mapping is a strategic tool that can help you visualize your business processes and how they interact with one another. When used effectively, process maps can:
Highlight areas that need improving
In business, there will always be issues you need to identify and iron out. Risk management is one way to avoid potential disasters, but it’s also important to have a system in place for dealing with issues when they inevitably arise. Process mapping can help you do just that by revealing problem areas and potential choke points in your business processes.

Once these are identified, you can begin to put into place measures to improve things. Maybe you need to add an extra step to a process to ensure quality control. Or maybe you need to invest in new software that will automate a task and speed up the workflow. Whatever the solution, process mapping can help you identify what needs fixing.
Boost efficiency and productivity
If your processes are running smoothly, you’ll see a corresponding increase in efficiency and productivity. When everyone understands the process and knows their role within it, things tend to move along more quickly.
This is where process mapping can be especially helpful for businesses with multiple locations or departments. By creating a standard map for all employees to follow, you can ensure a level of consistency and efficiency no matter where someone is working.
Encourage communication and collaboration
How do you know that everyone is on the same page? Communication and collaboration. When all members of a team can see the big picture, they’re better able to understand their role within it and work together to achieve common goals.
Process mapping can help with this by providing a visual representation of how tasks are interconnected. This makes it easier for team members to communicate with one another and identify potential bottlenecks.
Facilitate change
Processes evolve over time as new technologies are introduced and new methods are discovered. As such, your process map should be fluid, too — it should be able to adapt as your business changes.
This is another area where process mapping can be especially helpful. By creating a map that can be easily updated, you’ll save yourself the hassle of having to start from scratch every time something changes.
Manage risk
Businesses are always taking risks, but some risks are more manageable than others. Process mapping can help you identify and manage risk by showing you how your processes work — and where they could go wrong.
This is especially important for businesses that rely on multiple processes to function. If one of those processes fails, the business could be in trouble. Process mapping can help you identify and mitigate these risks.

Provide a basis for improvement
As mentioned earlier, process mapping can help you identify areas where your business can improve. But it doesn’t stop there. Once you’ve identified these areas, a process flowchart can also serve as a roadmap for making those improvements happen.
This is especially helpful for small businesses that may not have the resources to hire a dedicated process improvement team. Process mapping can help you do it all yourself.
Now that we’ve covered some of the basics, let’s delve a little deeper.
Process maps explained
Despite their name, process maps aren’t literal maps with geographical landmarks and street names. Rather, they’re diagrams that show how different tasks and activities are connected.
There are a few different types of process maps, but the most common is the flowchart diagram. In a flowchart diagram, each task or activity is represented by a rectangular box, and arrows connect the boxes to show the sequence of tasks or activities.
Here’s an example of a simple flowchart diagram:
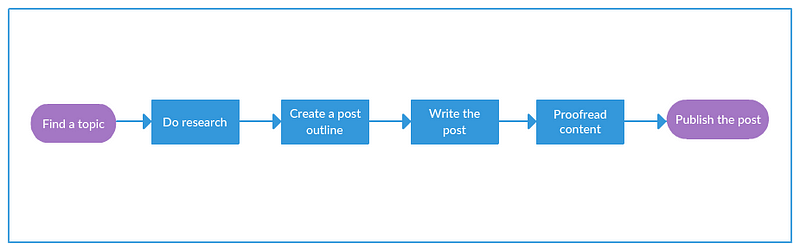
This diagram shows the steps involved in creating a social media post. As you can see, the process is relatively simple. The flowchart makes it simpler by representing each step as a box and by connecting the boxes with arrows.
Now that you have a basic understanding of what process maps are, let’s take a look at the basic steps for creating one. We’ll use the example of employee onboarding, as it’s a process that most businesses are familiar with.
- Start by identifying the steps involved in the process. In the case of employee onboarding, these might include: introductory meeting, HR paperwork, training, and so on.
- Next, create a flowchart diagram to represent the process. Each step should be represented by a rectangular box, and arrows should connect the boxes to show the sequence of tasks or activities.
- Once you have your flowchart diagram created, it’s time to label the boxes. For each step in the process, include a brief description of what happens in that step. For example, in the “introductory meeting” box, you might write “meeting with new employee to introduce them to the company.”
- When you have your flowchart diagram and accompanying descriptions, it’s time to add some detail. In the case of employee onboarding, this might include specifying the length of each step or detailing who is responsible for each task.
- Finally, review your process map and make any necessary tweaks. As your business changes, the process map may need to be updated to reflect those changes.
Six tips for effective process mapping
Now that you know the basics of creating a process map, let’s take a look at six tips for making them more effective.

1. Keep it simple.
The goal of process mapping is to simplify complex processes and make them easier to understand. When creating a process map, keep it simple by using basic shapes like rectangles and circles, and by connecting the boxes with arrows to show the sequence of tasks or activities.
The last thing you want is for employees to walk away feeling more confused than when they started, so try to keep each visual representation as straightforward as possible.
2. Label everything.
One of the benefits of a process flowchart is that it makes processes easier to understand. However, this only works if all the elements on the map are labeled correctly. Take the time to properly identify each task or activity, and be sure to include any relevant notes or comments.
3. Use colors and symbols.
When creating a process map, it’s helpful to use colors and symbols to further distinguish between different tasks or activities. For example, you could use different colors to represent the different departments within your company, or use symbols to indicate the type of task or activity.
4. Use images.
In some cases, it’s helpful to use process maps like a mood board or concept map, and include images to help illustrate the process. This can be especially helpful when you’re trying to communicate a process that’s difficult to put into words.
For example, if you’re making a process map to teach employees how to use a particular software, it may be helpful to include screenshots of the software interface.
5. Use Swimlanes.
Swimlanes are a great way to visually represent the different roles or responsibilities within a process. Just like in a sports pool, each lane represents a different player or team. This can be especially helpful when you have a complex process with multiple steps or stages.
6. Use timelines.
This tip blurs the lines slightly between process mapping and project planning; however, rather than setting restrictions or expectations for a project, the purpose of timelines in this instance is to give employees a better idea of how long certain processes will typically take.
This can be especially helpful when you have a process that’s frequently disrupted by unexpected delays. By including timelines on your process maps, you’ll help employees better understand and plan for potential delays.

Process Mapping: Final Thoughts
Has your business been a disorganized mess as of late? It could be something in the air, but more likely, it’s because your business lacks structure. The solution? Process mapping.
Process mapping is a great way to organize and simplify complex processes, and with the right tips, you can create maps that are both effective and easy to understand. By keeping things simple and using colors, symbols, and images to help illustrate the process, you’ll be well on your way to creating maps that employees will actually want to read.