
Projects are made up of many moving parts, and it’s easy to fall off the rails if these moving parts are not properly coordinated. It’s like trying to assemble a complex jigsaw puzzle without first looking at the picture on the box.
This is where project timelines come into play, acting as a blueprint for assembling the project in a logical and cohesive manner. By taking the time to design an effective project timeline, you can avoid many of the common pitfalls that lead to project failure.
In this article, we will discuss some best practices for designing timelines, as well as some tools and techniques that can help make the process easier.
We’ll be discussing:
- What is a project timeline?
- Why do you need a project timeline?
- What kinds of projects require a timeline?
- The different types of project timelines
- Creating your timeline from scratch
Ready to get started? Let’s go!
What is a project timeline?
When you picture a project timeline, you may assume it is nothing more than a calendar with specific tasks and deadlines listed for each day. While this is one way to create a timeline, it is not the only way. In fact, your project timeline can be as simple or complex as you need it to be.
A project timeline is a document that outlines all of the steps (or tasks) required to complete a project, as well as the order in which they need to be completed and the deadlines associated with them.

Creating a timeline is an essential step in any project management process. It helps you to:
- Clarify the project goals and objectives
- Assign specific tasks to team members
- Set deadlines for each task
- Track the progress of the project
- Identify potential problems and solutions
- Manage expectations
When creating a timeline, it is important to think about all of the steps involved in completing the project and then order them according to priority. You will also need to assign deadlines to each task.
While it is important to be realistic when setting deadlines, you don’t want them to be so tight that they become impossible to meet. It is better to set slightly aggressive deadlines and then revise them as needed, than it is to set unrealistic ones that will only lead to frustration and delays.
Why do you need a project timeline?
Great question! Perhaps you are a smaller business where projects aren’t as extensive, and you feel as though a timeline is not necessary. Even if this is the case, a timeline can still be helpful for documenting specific tasks, dates and assigned personnel.
In larger businesses or those with more complex projects, a project timeline becomes essential for managing expectations and ensuring that all aspects of the project are accounted for. A timeline can help to prevent overlap or gaps in the project, and it can also help to identify potential problems before they become too costly or time-consuming to fix.
Let’s run through the main benefits of using a project timeline:
1. Clarifies the project goals and objectives
A timeline can help to ensure that all members of the team are on the same page when it comes to the project goals and objectives. This is especially important early on in the project, when everyone is still working out what needs to be done.
2. Assigns specific tasks to team members
A timeline communicates what tasks need to be completed and by whom, helping to ensure that no one is overburdened and that all tasks are evenly distributed.
3. Sets deadlines for each task
Deadlines help to keep the project on track and ensure that it is completed within the desired timeframe.
4. Tracks the progress of the project
A timeline can be used to track the progress of the project and identify any potential delays or problems.
5. Identifies potential problems and solutions
Timelines have a way of revealing potential problems and solutions that might not otherwise be considered.
6. Manages expectations
By setting realistic deadlines and communicating updates on the project timeline, a project manager can manage the expectations of stakeholders, clients, and team members.

Evidently, there are many benefits to using a project timeline. It is an essential tool for all project managers, regardless of their level of experience.
What kinds of projects require a timeline?
You may be working on a one-man project, such as a remodeling job around your house, and assume that you don’t need a timeline. After all, you know when the project will start and finish.
However, even one-person jobs can benefit from a timeline. It can help you to better visualize the project, allocate time and resources accordingly, and avoid overlap or conflict with other projects.
Anytime you have multiple steps that need to happen in a specific order, it’s helpful to create a timeline. For example:
- Your company wants to launch a new product
- You’re completing a multi-phase project for a client
- You’re starting a new job and have a lot of onboarding tasks to complete
In each of these cases, it would be helpful to have a visual representation of what needs to happen when. This can help you stay organized and avoid costly delays.
Let’s look at a fleshed out example. Say you’re the project manager for your company’s new product launch. You have decided to put together a team of 5 people, and you have allocated 3 months for the project. The product launch has several key components:
- Developing the product concept
- Designing the product
- Testing the product
- Launching the product
If you want to be successful, each of these components must happen in a specific order, and you must allow enough time for each step. If everyone works on a different part of the project without communicating or following a timeline, it’s likely that the project will be complicated, delayed, and over budget.
The different types of project timelines
Before you can begin to design your project timeline, you first need to understand the different types of timelines that are available to you. Some types will be better suited to your project than others.
1. The Historical Timeline
This is one of the more basic types of timelines, and it simply records the tasks you’ll be completing in chronological order. You are likely to see these used in small-scale projects or when tasks are relatively simple. They can be helpful for understanding the order of events, but they’re not always very useful for complex projects.
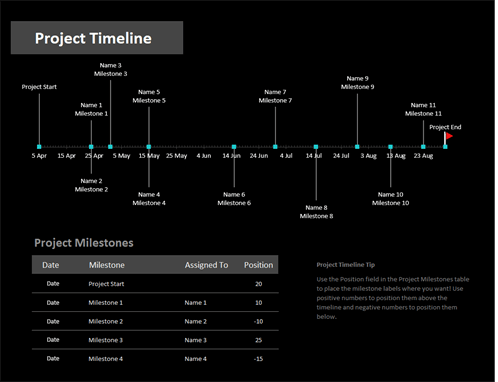
2. The Milestone Timeline
This type of timeline is a little more sophisticated than the historical timeline, and it is designed to help track specific milestones that need to be reached in order for the project to be successful. It looks like a horizontal bar chart or a simple line, with each milestone represented by a dot.
3. The Critical Path Timeline
When you want to find out the shortest path between two points, you use a critical path. This is also what is used in project management to determine the most important tasks that need to be completed in order for the project to be successful.
The critical path timeline is very similar to the milestone timeline, but it is specifically designed to track the critical path tasks.
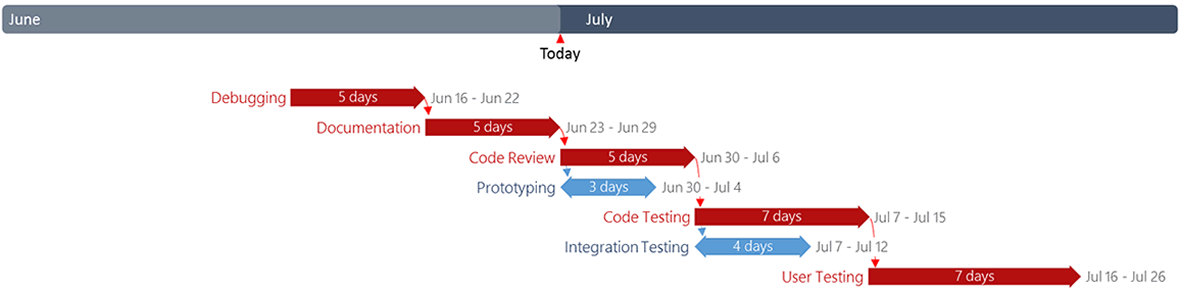
4. The Gantt Chart Timeline
This is the most popular type of timeline; it used across most industries and is best suited for larger projects with many tasks. The Gantt chart timeline is a graphical representation of the project that uses horizontal bars to indicate when a task will be completed.
This type of timeline can help you to see how the different tasks are related and how they fit into the overall schedule.
There are other types of timelines that may be specific to your industry or project, but these four are the most common types. Now that you understand the different types, let’s take a look at how to design your ideal project timeline.
Creating your timeline from scratch
Once you decide which type of timeline you will use, the next step is to create it. This can be done in a number of ways, but the most important part is to make sure that it is tailored to your specific project.
The first step is to gather all of the information you will need to create your timeline. This includes data on the start and end dates of the project, as well as the deadlines for each stage of the project. You will also need to know how much work needs to be done each day in order to complete the project on time.
With all of this data in hand, it is time to start creating your timeline. Let’s run through each step in detail.
Step 1: Understand and communicate your project’s scope
The first step in creating a project timeline is understanding and communicating the project’s scope. In other words, you need the specific objective of the project as well as a full understanding of the deliverables.
This is especially important when it comes to complex projects with many stages and tasks. Without a clear understanding of the project’s scope, it will be difficult to create an accurate timeline.
Here’s an example of what your scope might look like:
The objective of this project is to create a new website for ABC Company. The deliverables include designing the website, creating the content, and launching the site. We will deliver the final product on July 1st.
Step 2: List your tasks and split them into milestones
The next step is to list all of the tasks that need to be completed in order to achieve the project’s objectives. Once you have this list, you can start splitting them into milestones.
A milestone is a specific point in a project where a task or set of tasks has been completed. Milestones can be used to track the progress of a project and ensure that it is on schedule.
When creating your milestones, it is important to make sure that they are realistic and achievable. You don’t want to set too many milestones or else it will be difficult to meet them all.

Here’s an example of how you might list the tasks for your website project:
Task 1: Research different website designs
Task 2: Select a design for the website
Task 3: Create a wireframe for the website
Task 4: Create the content for the website
Task 5: Launch the website
Once you have your list of tasks, you can start splitting them into milestones. Here’s an example of the milestones you might set for Task 1:
Milestone 1: Research different website designs
Milestone 2: Choose three different website designs
Milestone 3: Present the designs to the client
Milestone 4: Get feedback from the client
Milestone 5: Select a design for the website
Step 3: Set deadlines for each milestone
Next, you need to set deadlines for each milestone. This will ensure that the project is on schedule and that all tasks are completed on time.
When setting deadlines, it is important to keep in mind the amount of work that needs to be done each day. You don’t want to set a deadline that is too tight and makes it difficult to meet the objectives of the project.
This means you will need to estimate how many days it will take to complete each task — but make sure you give yourself some leeway in case something goes wrong.
Step 4: Assign tasks and roles to team members
Now you’ll need to assign tasks and roles to team members. You should have a fair idea of who is responsible for each task by this point, as each person will have skills in specific areas.
When assigning tasks, it is important to make sure that everyone is aware of their responsibilities and that they are able to complete them on time. Write up a task list and send it to all team members so that they know what is expected of them.
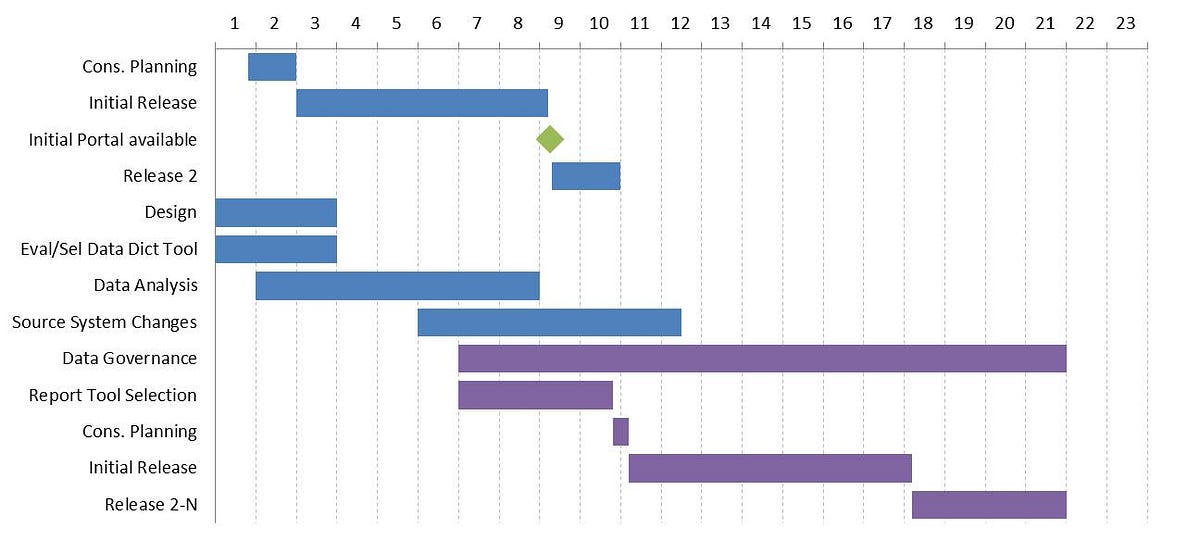
Step 5: Create a Gantt chart
The final step is to create a Gantt chart. This will show the deadlines for each milestone, as well as the tasks that need to be completed in order to meet them.
A Gantt chart shows the deadlines for each milestone and the tasks that need to be completed in order to meet them. It also includes information on how much work needs to be done each day. This will help you to stay on track and ensure that the project is completed on time.
Gantt charts can be created in a number of different software programs, such as Microsoft Excel or third-party applications like GanttProject.

Final Thoughts
So, there you go — a step-by-step guide to creating an effective project timeline. Keep in mind that there is no “right” way to do things, so feel free to adapt the tips and tricks above to fit your own specific needs.
Most importantly, always remember that timelines should be flexible — be prepared to make changes as needed, and don’t be afraid to experiment until you find a timeline that works best for you and your team.